
 Hi, it was while having a conversation with a friend that the topic came up, about the benefits of understanding the proper golf swing sequence. Questions cropped up such as.
- What are the main parts of the swing I should work on?
- What is required in the backswing?
- What provides the power?
To name a few. The golf swing is basically a mechanical process and as such, you can only achieve a good swing when you practice the basic sequences of these mechanics. Then they need to be repeated with each swing of the club when out on the course.
As you become proficient in executing the golf swing mechanics step by step, you can then begin to experiment with subtle changes to the swing. This will help to control the ball’s flight to suit your shot needs.
Possibly we are getting a little ahead of ourselves here and will need to start with the golf swing basics. Basics such as, how to position the feet and shoulders, the knees, the backswing, the downswing, ball contact and the follow-through.
So, let’s work through these elements which will culminate in providing a decent swing. Incidentally, the post, how to learn golf for beginners would be a great starting point if there is some aspects about learning to play you’re not quite sure about.
Aligning the Feet and Shoulders
 Firstly, I assume you have learned to grip the club properly using whichever of the three favored grips of your choice. If so, fine let’s get started with the first stage which is the shoulders and the feet.
Aligning your shoulders and feet in the proper fashion will save you many headaches in the future. It’s amazing how many folks will start to blame every other aspect of their swing before they decide to check out the position of the shoulders and feet.
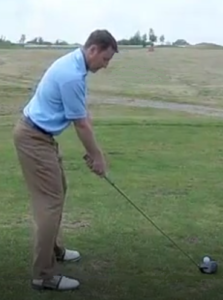
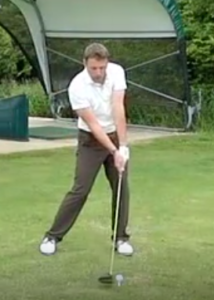
When setting up to the ball, the feet and everything in between the shoulders, need to be aligned parallel and left of the target. Which may be a position on the fairway or the pin on the green.
This means that the feet, knees, hips and shoulders should all be stacked with one central point. It’s no good with the feet being open and the shoulders in a closed position.
Imagine a straight piece of railway track ahead and you’re standing on one rail while the ball is sitting on the other rail opposite. Being properly aligned and hitting the ball straight with the driver for example, it would ideally land on the rail track some 200 to 300 yards ahead. Or when you have fully mastered the game and sending the ball some 400 yards down the fairway in a similar fashion to Dustin Johnson. Who knows?
Practicing Good Alignment
As with all sequences in the golf swing the alignment needs to be well practiced and practiced until it is accomplished. It’s a basic part of the swing and if it is all wrong the results will be erratic. If it is not right, you may find yourself blaming your grip, the backswing, downswing, the swing plane and yes even the clubs as so many do!
Training covering alignment and everything required to ensure you build up a successful swing can be found at the Lesson In Golf site. With the handy option of being able to choose the level you want to start at.
Don’t think you will be automatically parallel to the target simply by looking straight at it. Every time you stand up to address the ball check that you have the ball facing your target, bearing in mind the rail track example above. An exception to this is with a little chip shot, where you can stand more open which can help to visualize the shot better.
Using alignment sticks can help with your practice sessions. The pro’s use them all the time in their practice sessions, so that should tell us something about the importance of being lined up properly. If you don’t have sticks to hand, a club will do much the same job.
It is always a good idea while practicing your alignment to ensure that the face of whichever club you are using is also facing the target. An open or closed club face will eradicate any attention you have given to your body alignment.
Using the Knees
 Although as mentioned earlier the knees at the address to the ball should be in line with the feet and shoulders but they should also be flexed. Not straight and stiff.
In the backswing it may look like the right knee locks in a straight position, this is not, nor should it be the case.
On the other hand, in the downswing the left knee does straighten as well as lock up but only just prior to impact with the ball. This can add some extra power to the shot.
If you find this working well for you and getting distance, continue as long as the direction is fine.
Often some people find that the direction of the shot can be a little more wayward with the leg locked in a straight position and having it slightly bent can keep the ball flying straighter. Sometimes you will just have to use common sense. Do you need the distance on a particular shot, or would a straighter shot be more important?
Is the fairway wide enough to allow for a slightly wayward shot? Would you get away with a less straight shot? All decisions that you will need to take as circumstances dictate.
The Backswing Without Swaying
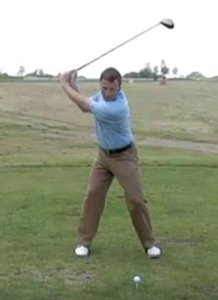
 A good mental thought to have with the backswing is to visualize a circle. Everything, which includes the shoulders, the hands and the club head all travel in a circle. These all travel around, what should be a still head at the center of the axis. The shoulders travel the least and the club head travels the furthest.
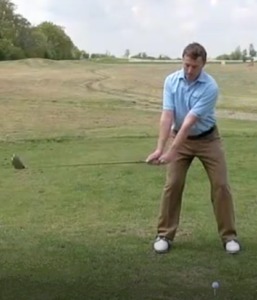
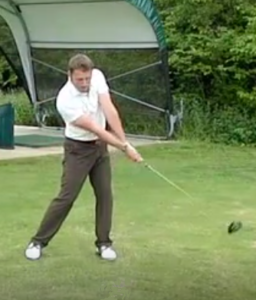
A good exercise I have been trained to use is, to start with a short backswing which forms an L-shape and follows through with a forward swing which again finishes to an L-shape. Performing this in front of a mirror will help you to see if it is being performed properly.
I would just continue practicing this swing sequence without hitting a ball. While keeping the left arm straight and parallel to the ground the club shaft would be pointing straight up to form a right angle with my left arm. The end of the shaft will be pointing to the ground and then pull back down again to where a ball would sit and back up on a short follow through.
While practicing this I usually use an iron and concentrate on brushing the grass just were an imaginary ball would sit.
Again, remember the previous step we learned. Before practicing the downswing get into the habit of checking the alignment of the feet and shoulder etc. Even though you are not striking a ball.
The Downswing
Before delving into the more advanced moves in the downswing, make sure that the previous steps of the backswing to L-shape and downswing to L-shape have been learned. When you feel comfortable with this exercise it’s then time to start hitting some balls.
The Lower Body is the Starter in the Downswing
 Many people are confused with, what part of the body should start the downswing. Well unless you start it with the lower body you will run into all sort of problems. Just the same as we talked about with not having the alignment right, if we make a bad shot, we don’t know where to start and fix it. So, learn the proper sequential stages of the downswing.
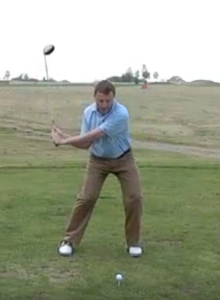
Ask any of the pro’s and they will explain that they use the core of the body to add power to the shot. Using the hips, they feel like they are squeezing the feet into the ground. In the golf swing sequence, this is what they term, using the core.
The top part of the body is next to move followed by the arms and then the club. The arms kind of pull the club handle closer to the body and the handle of the club moves in front of where the ball is. This provides more power as the club whips through. That is the sequence and if you want to increase the power even more simply speed up these moves.
Of course, it is as well to practice the moves at a slower speed until the proper sequence becomes a normal part of the swing.
Contact With the Ball
 There is not a lot of time to concentrate and ensure that we make good contact with the ball in the downswing. This means we will have to train the swing in such a way that the club face meets the ball without thinking too much about it. So how do we do this?
The aim is to strike the ball with the sweet spot of the club, which is found in the middle of the face. Let’s use a mid-iron for our example here of how we can ensure a clean hit. Hitting low running shots by topping the ball is a result of not finding the sweet spot.
To overcome this the club face needs to have a forward lean to it and that we do by tilting the shaft slightly forward. In effect we need to hit down on the ball slightly.
If you think it’s difficult to hit the ball with the sweet spot every time, then you are right. The sweet spot on a club is about the same size as the head of a pin. Yes, not very big but that’s what accounts for when you hit the ball so well. Perhaps that’s the more unusual type of shot in your game than normal and you don’t understand what has happened.
 Let me explain. You have heard the saying, “Hit that right on the button”. What is happening is, the club sweet spot, which is a very small button, strikes the center of the ball in a slightly downward motion.
To help accomplish this, keep the left wrist pointing in a more downwards fashion. This pulls the shaft handle more forward which in turn reduces the loft on the club allowing the sweet spot to contact the ball with a slight compression at impact.
This is the opposite of trying to scoop up the ball which causes all kinds of problems such as topping the ball. Let the club loft do the work.
Final Golf Swing Sequence The Follow-through
 The final sequence of the golf swing is the follow-through. Being final doesn’t mean it is of less importance. Those beginning to play golf can be forgiven for thinking that hitting the ball is the final stage of the swing. Not so. Apart from looking very professional with a good-looking follow-through and a high finish, it can provide extra power and a true direction.
Releasing is the process of the hands changing position. With the right hand now overtaking the left hand and pushing it in a forward direction. This should be done naturally without forcing anything, as the club swings through from your right-hand side to your left side.
A natural release will avoid sending the ball to the right of target known as a blocked shot. Releasing to much will create a draw shot.
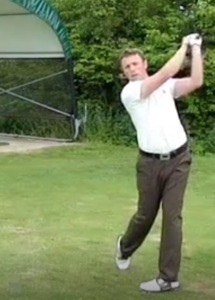
The aim is to finish the swing with the belt buckle facing the target and your chest just left of target. The momentum created with swinging the club at speed will pull the front of your body around and stretching upwards.
With a full shot, your hands should finish up behind your left ear in a high finish.
 Much of the power that is generated with this final explosive connection with the ball, is provided with a strong follow-through. Apart from gaining power by hitting straight through the ball, a straight line towards the target is also achieved.
A balanced finish is what you really want to achieve. Swinging erratically will not give a balanced finish. Almost all of your weight will now be resting firmly on the left foot without the foot having moved.
The toe of the right foot should only have light contact with the ground and the sole of the foot facing in the opposite direction to the target line. This finish ensures that you have successfully transferred almost all of your weight over to your left side in your follow-through.
In Conclusion
As with everything in golf once the various stages have been learned they need to be practiced in order to train the body to execute them in a natural fashion time and time again. Take the tips I have provided here on board and get off down to the driving range and perform them. Even print out the tips and highlight areas that you think will need to be worked on.
Playing a competitive game is probably not the best time to start practicing different stages of the swing although you could do so when out for a friendly game with a friend.
The best advice I would give to anyone looking to learn the proper golf swing sequence in easy steps, would be to have a set of professionally produced training videos. They can be watched, paused and played again at the areas you need to work on until mastered. Have fun.